Hey everyone, in this post we will discuss about a very important topic. So welcome to the Python MongoDB Connection Tutorial. In this tutorial i will show you how can you use MongoDB database using python and you will also learn what is MongoDB, why we use it, downloading and installing, basic CRUD operation and everything about it. So let’s gets started without any delay.
Python is very powerful language, you can develop different kinds of applications using python. In our previous tutorials, we have seen – how to work with SQL database using python, but in this post we will see how to work with NoSQL database using python. You can check some examples of SQL database from here.
Python MySQL Tutorial : Using MySQL Database with Python
CRUD Operation In Python PostgreSQL
Contents
Python Mongodb Connection – Getting Started With MongoDB
So in this section, we will learn what is MongoDB and why we use it. But before dealing with what is MongoDB, at first we have to understand what is NoSQL database because MongoDB is NoSQL database.
What Is NoSQL Database ?
For decades, SQL databases were the only option for developers looking to build large, scalable systems. But the ever-increasing need for the ability to store complex data structures led to the birth of NoSQL databases, which allow a developer to store heterogeneous and structure-less data.
- NoSQL stands for “Not Only SQL”.
- It is an alternative to traditional relational databases in which data is placed in tables and data schema is carefully designed before the database is built.
- NoSQL databases are especially useful for working with large sets of distributed data.
Now you can think which is good, so my answer is that neither SQL is bad nor NoSQL is bad. Both SQL and NoSQL have their strengths and weaknesses. So you have to select according to your application’s requirement. When choosing a database you should consider the strengths and weaknesses of each database carefully.
What Is MongoDB ?
Now let’s come to main focus of this topic that is MongoDB. So MongoDB is a NoSQL database.
- MongoDB stores data in flexible, JSON-like documents, that means fields can vary from document to document and data structure can be changed over time
- The document model maps to the objects in your application code, making data easy to work with.
- MongoDB is free to use.
This is a table of a SQL database.
| First Name | Last Name | Age |
| Raj | Hamid | 20 |
| Harsh | Kumar | 25 |
But in MongoDB, data are stored in JSON format. This is the structure of MongoDB document.
|
1 2 3 4 5 6 7 8 9 |
[ { FirstName:"Raj", LastName:"Hamid", Age:20 }, { FirstName:"Harsh", LastName:"Kumar", Age:25 } ] |
Features
Some features of MongoDB is following –
-
MongoDB allows your teams to easily organize, use and enrich data – in real time, anywhere.
-
Best way to work with data.
-
Put data where you need it.
-
Run anywhere.
Downloading And Installing MongoDB
Now you have to download and install MongoDB in your system. So follow the following steps –
- Go to this URL and download MongoDB Download.
- Now install it as usual you install any software. But if you are getting any issues then check this Install MongoDB.
- Now go to your command prompt and run the following command –
|
1 2 3 |
"C:\Program Files\MongoDB\Server\4.0\bin\mongod.exe" |
Setting Environment Variable
Now you have to set your MongoDB path in Environment variable.
- So copy your path of MongoDB directory and paste it in system environment variable area.
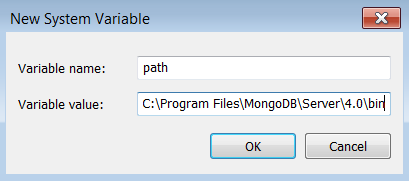
- I am sure you already know how to go to the New System Variable, but anyway if you are getting any issue then check this link.
Starting The MongoDB Server
Now go to your command prompt and run following command
|
1 2 3 |
mongod |
- you will see the following output.
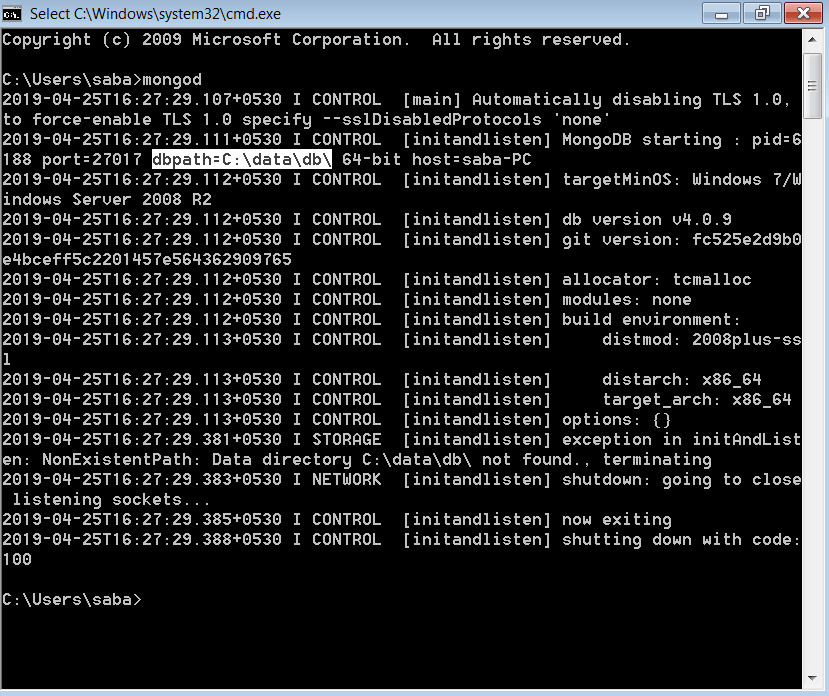
- So you can see MongoDB is starting but shutting down. This is because of MongoDB is a document based database and it requires a db path where MongoDB can store files.
- So in our case, right now we just started mongod without db path.
- In the above image, i have marked the dbpath. So let’s create this path.
- Open C drive and create a directory data and inside this data directory create a new directory db.
- Now run again mongod command in your command prompt and now you can see the MongoDB is not terminating.
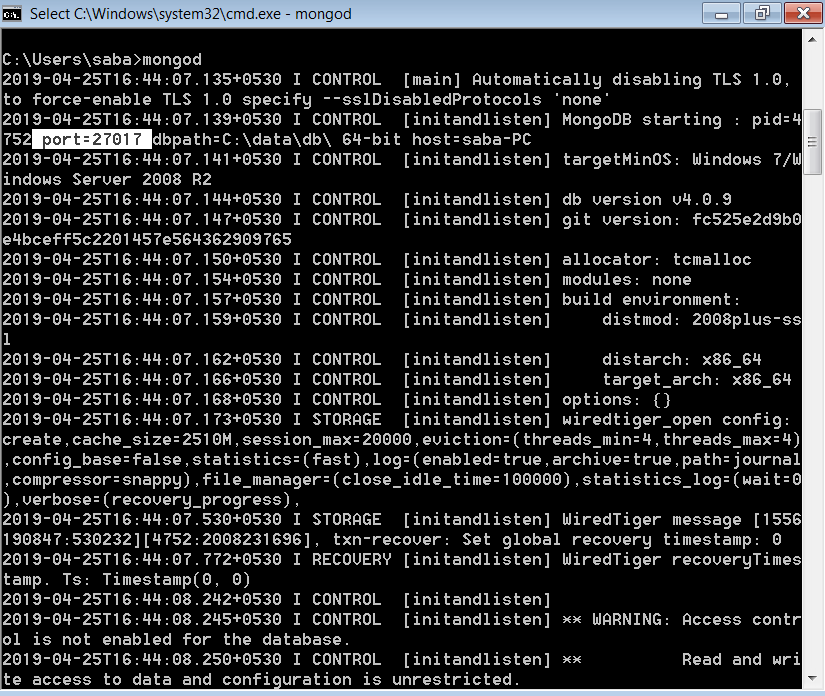
- And in C:\data\db, you can see there is lots of files generated by MongoDB server.
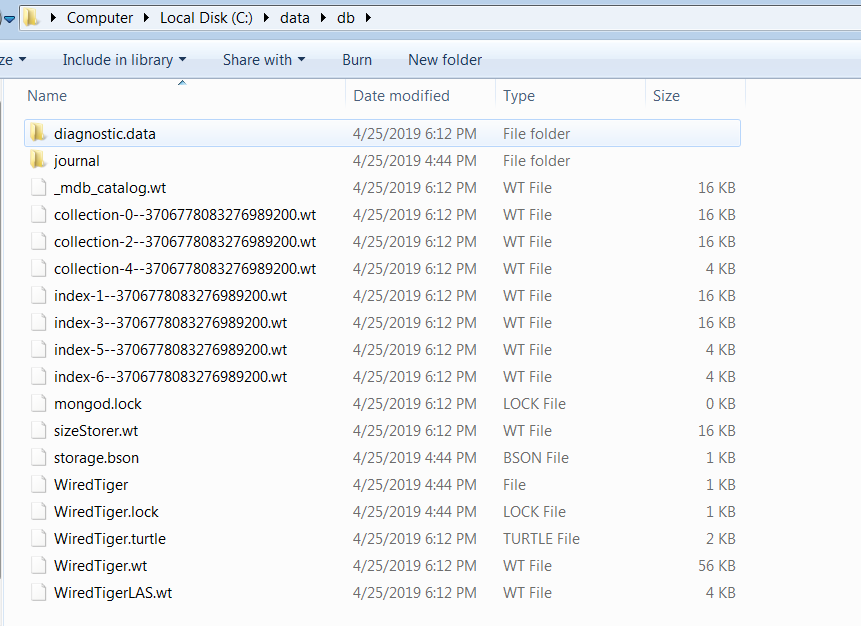
Bingo, now your MongoDB server is running successfully.
Most important thing is that right now your MongoDB default port is 27017 and this port number should be remember because when you want to access your database from different applications, may be python or something else that time you need to provide this port number.
So now let’s start our main focus of this tutorial that is accessing MongoDB database using python.
Python Mongodb Connection – Basic CRUD Operations
Before performing CRUD operations, firstly you have to connect your database. So let’s see how to do that.
PyMongo
- PyMongo is the official Python driver for MongoDB.
- Why PyMongo – PyMongo was created to incorporate advantages of python as the programming language and MongoDB as database. Since python provides an easy to implement way of programming and MongoDB can easily handle the big data, the PyMongo tool can be of a great use since it provide best of utilities.
Installing PyMongo
- You can install PyMongo module by running following command on your terminal.
- Make sure you are connected to internet.
|
1 2 3 |
pip install pymongo |
Creating A New Project
So now open your python IDE and create a new project and inside this project create a python file. Let’s see my project.
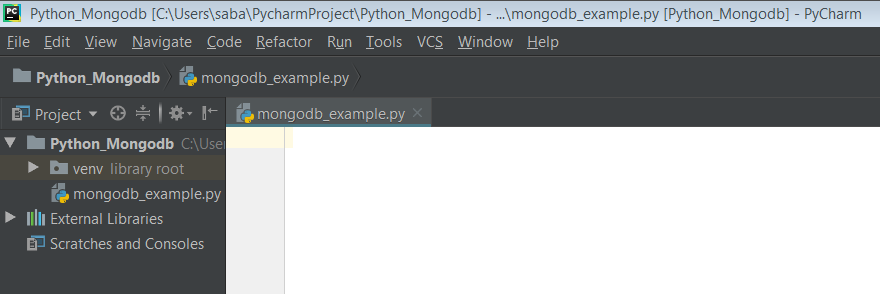
Establishing Connection With MongoDB Database
So to establishing connection with your database you need to do following tasks.
- First you have to create a connection variable.
- Then you have to create a database. There are two cases, either you are using an existing database or you want to create a new database
- Now write the following code.
|
1 2 3 4 5 6 |
from pymongo import MongoClient connection = MongoClient('localhost', 27017) my_database = connection.restaurants_database |
Explanation
- The first thing you have to do is importing MongoClient class. This is used to communicate with the running database instance.
- Now you have to create a connection variable. And with pymongo call the MongoClient method. You have to pass two arguments to the MongoClient() method.
- The first one is host name or IP address of MongoDB server where the MongoDB is installed and the second one is port number where your MongoDB is communicating to outside of server.
- So our host name is localhost and port no. is 27017.
- Now you have to create a database, so there is two cases either you are using an existing database or created a new database.
- So for creating database, you have two options, either you can create it as an attribute or you can also use the dictionary-style.
- In the above code i have used as an attribute method but you can also use the dictionary-style. So the dictionary style method is following.
|
1 2 3 |
my_database = connection['restaurants_database'] |
- If you want to use an existing database then you have to simply put that database you want to connect.
When you run the above code, you will see your database is not created yet, this is because of that an empty database is not allowed inside MongoDB. So you need to actually create some collections inside your database to appear this database inside your MongoDB server .
Now we will perform CRUD(Create, Read, Update, Delete)operation in MongoDB database. So let’s gets started without any delay.
Create Operation
In create operation, you need to create a collection that means you have to insert some data into your database. So let’s see how to do that.
Creating Collection
In MongoDB terminology, a collection is a group of documents that are stored together within the database. So now to create a collection write the following code.
|
1 2 3 |
data = my_database.data |
Adding Data into Collection
Now you have to add some data into your collection. So write following code for adding data into collection.
|
1 2 3 4 5 6 7 8 |
entry_data = { 'Name': 'Raj Restaurants', 'Location': 'Patna', 'Contact_No': 567899, 'Type' : 'Fast Food' } |
Putting Documents Into Collection
Now you have to put that document into your collection. Here you have two options, either you can put one document at a time or multiple document at a time.
Putting One Document at a Time
You can insert one document into your collection at a time by using insert_one() method. So write the following code.
|
1 2 3 4 5 |
result = data.insert_one(entry_data) print("Data are successfully Inserted...") print('One post: {0}'.format(result.inserted_id)) |
On running you will get following output –
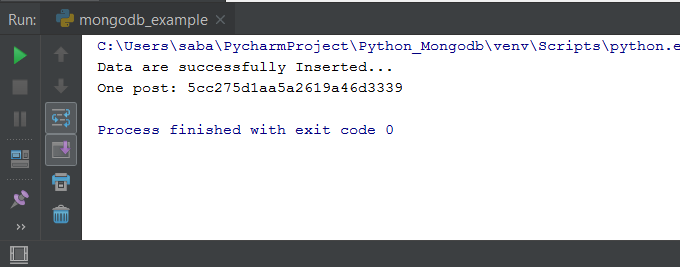
Putting Multiple Data at a Time
Now, if you have multiple documents then it will be a right choice to put them all together simultaneously. insert_many() method takes an array of document data. So for implementing this write the following code.
|
1 2 3 4 5 6 7 8 9 10 11 12 13 14 15 16 17 18 19 20 21 22 23 24 |
entry_data1 = { 'Name': 'Kaveri Restaurants', 'Location': 'Ranchi', 'Contact_No': 356789, 'Type' : 'Veg Food' } entry_data2 = { 'Name': 'Basant Vihar', 'Location': 'Patna', 'Contact_No': 35635689, 'Type' : 'South Indian Food' } entry_data3 = { 'Name': 'Punjab Sweet House ', 'Location': 'Ranchi', 'Contact_No': 3567833489, 'Type' : 'Sweets' } data = data.insert_many([entry_data1, entry_data2, entry_data3]) print("Data are successfully Inserted...") print('Multiple posts: {0}'.format(data.inserted_ids)) |
- inserted_ids holds the id of the inserted document.
- Now run the above code, you will get following output.

ObjectIds are dynamically generated when you insert data and consist of a Unix epoch, machine identifier, and other unique data. So don’t worry if you are not getting ObjectIds as mine.
Let’s Get Code Together
|
1 2 3 4 5 6 7 8 9 10 11 12 13 14 15 16 17 18 19 20 21 22 23 24 25 26 |
from pymongo import MongoClient # Establishing Connection with MongoDB server connection = MongoClient('localhost', 27017) # Creating Database my_database = connection.restaurants_database # Creating Collection data = my_database.data # Adding data into collection entry_data = { 'Name': 'Raj Restaurants', 'Location': 'Patna', 'Contact_No': 567899, 'Type' : 'Fast Food' } # Putting document into collection result = data.insert_one(entry_data) print("Data are successfully Inserted...") # Fetching inserted Id of document print('One post: {0}'.format(result.inserted_id)) |
Read Operation
Now, in read operation we will fetch documents that are stored in our database. So write the following code.
- To read one document, we will use find_one( ) method and to read each documents we will use iteration.
|
1 2 3 4 5 6 7 8 9 10 11 12 13 14 |
from pymongo import MongoClient connection = MongoClient('localhost', 27017) my_database = connection.restaurants_database data = my_database.data print("\n ---Reading One Document---\n") print(data.find_one({'Type': 'Sweets'})) print("\n ---Reading All Documents---\n") for rest_data in data.find(): print(rest_data) |
The output will be following –

Update Operation
In update operation, you can update your existing document with new values.
- You have two options to update document. One is using update_one( ) method and second one is update_many( ) method.
- To update records, you have to pass two parameters into update method.
- One is a query object defining which document to update and second one is an object defining the new values of the document.
Updating Single Document
Let’s see it practically, so write the following code.
|
1 2 3 4 5 6 7 8 9 10 11 12 13 14 15 16 17 18 19 20 |
from pymongo import MongoClient connection = MongoClient('localhost', 27017) my_database = connection.restaurants_database data = my_database.data # Query for object defining which document to update update_query = { 'Name': 'Basant Vihar' } #Query for object defining the new values of the document updated_values = { '$set': { 'Name': 'Blue Moon' } } data.update_one(update_query, updated_values) print("\n ---UPDATED RECORDS--- \n") for x in data.find(): print(x) |
Let’s see the output –

- you can see Basant Vihar restaurants name updated to Blue Moon.
Updating Multiple Documents
|
1 2 3 4 5 6 7 8 9 10 11 12 13 14 15 16 17 18 19 20 21 |
from pymongo import MongoClient connection = MongoClient('localhost', 27017) my_database = connection.restaurants_database data = my_database.data # Update all the documents where the Location starts with "R" update_query = { "Location": { "$regex": "^R" } } updated_values = { "$set": { "Name": "Yellow Sapphire" } } x = data.update_many(update_query, updated_values) # Printing Number of updated documents print(x.modified_count, "documents updated.") print("\n ---UPDATED RECORDS--- \n") for x in data.find(): print(x) |
- In this example i have used regex , if you don’t know about regex then check this link.
Delete Operation
You can perform delete operation in MongoDB database in 3 ways. So let’s see all of them one by one.
Deleting One Document
So for deleting one document you have to use delete_one( ) method. It will take one parameter that is query object defining which document to delete. So let’s see it practically.
|
1 2 3 4 5 6 7 8 9 10 11 12 13 14 15 16 |
from pymongo import MongoClient connection = MongoClient('localhost', 27017) my_database = connection.restaurants_database data = my_database.data # Query for deleting one document delete_query = { "Location": "Ranchi" } data.delete_one(delete_query) for x in data.find(): print(x) |
- It will delete that document whose Location is Ranchi.
- Remember one thing that if the query finds more than one document, only the first occurrence will be deleted.
Deleting Many Document
If you want to delete many document then you have to use delete_many( ) method. It will an argument that is a query object defining which documents to delete. So write the following code to do it.
|
1 2 3 4 5 6 7 8 9 10 11 12 13 14 15 16 17 |
from pymongo import MongoClient connection = MongoClient('localhost', 27017) my_database = connection.restaurants_database data = my_database.data # Query for deleting many documents delete_query = { "Location": {"$regex": "^Patna"} } delete_docs = data.delete_many(delete_query) print(delete_docs.deleted_count, " documents deleted.") for x in data.find(): print(x) |
- It will delete all the documents which location is Patna.
Deleting All Documents
So for deleting all the documents, you have to call delete_many( ) method without any query object. That means you don’t need to pass any query object to delete_many method. So write the following code.
|
1 2 3 4 5 6 7 8 9 10 11 12 13 14 15 |
from pymongo import MongoClient connection = MongoClient('localhost', 27017) my_database = connection.restaurants_database data = my_database.data # Deleting all documents delete_docs = data.delete_many({}) print(delete_docs.deleted_count, " documents deleted.") for x in data.find(): print(x) |
CONGRATULATIONS , we have done all the CRUD operation very well.
So guys, it was all about the Python MongoDB Connection tutorial. Yeah it is very lengthy but i am pretty sure you found it very helpful. If you did it, then share this article with your friends, that will surely helpful for me. And if you have any query regarding this then feel free to drop your comment in comment section.

