

Welcome to Python GUI Login tutorial. In this tutorial i will teach you to create a Login form where user can register themselves and can login. Registration and Login requires everywhere, either you are filling any form or want to access any application. So in this tutorial we will see how to implement user registration and login in python.
In this, we will create a GUI interface. Python provides Tkinter toolkit to develop GUI applications. In python, you can develop any GUI applications easily. If you have ideas then you can turn your imagination into reality and make many creative things in programming. So without wasting time let’s start our Python GUI Login tutorial. It may be lengthy so guys please keep patience and follow this till the end, and i am pretty sure you will learn much knowledge and also enjoy.

Python GUI Login Tutorial – Getting Started With Tkinter
Creating New Project
Open your IDE and create a new project and then inside this project create a python file. I prefer PyCharm but you can prefer anyone as it doesn’t matters, but if you want to know best python IDEs then refer Best Python IDEs.
Importing Tkinter Module
For importing tkinter just write one line of code.
|
1 2 3 |
from tkinter import * |
Designing Main Screen
So first of all you have to design the main screen. This screen have two buttons Login and Register. So let’s see how to implement this.
|
1 2 3 4 5 6 7 8 9 10 11 12 13 14 15 16 17 18 19 20 21 22 |
def main_account_screen(): main_screen = Tk() # create a GUI window main_screen.geometry("300x250") # set the configuration of GUI window main_screen.title("Account Login") # set the title of GUI window # create a Form label Label(text="Choose Login Or Register", bg="blue", width="300", height="2", font=("Calibri", 13)).pack() Label(text="").pack() # create Login Button Button(text="Login", height="2", width="30").pack() Label(text="").pack() # create a register button Button(text="Register", height="2", width="30").pack() main_screen.mainloop() # start the GUI main_account_screen() # call the main_account_screen() function |
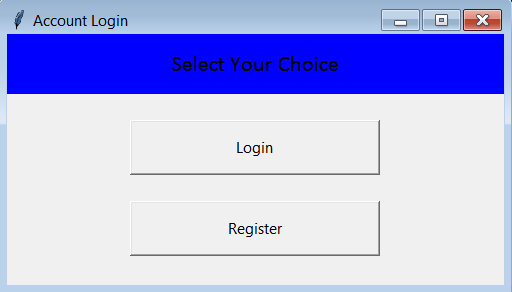
- You can also customize the design of main screen as per your choice and make it more attractive.
- So let’s see the output of this code.
Designing New Screen For Registration
Now we will design a new screen for registration. That means if a user press register button on main screen then a new window will appear where users have to enter username and password. And this way they can register themselves. So let’s see how to do that.
|
1 2 3 4 5 6 7 8 9 10 11 12 13 14 15 16 17 18 19 20 21 22 23 24 25 26 27 28 29 30 31 32 33 34 35 36 37 38 39 40 41 42 43 |
def register(): # The Toplevel widget work pretty much like Frame, # but it is displayed in a separate, top-level window. #Such windows usually have title bars, borders, and other “window decorations”. # And in argument we have to pass global screen variable register_screen = Toplevel(main_screen) register_screen.title("Register") register_screen.geometry("300x250") # Set text variables username = StringVar() password = StringVar() # Set label for user's instruction Label(register_screen, text="Please enter details below", bg="blue").pack() Label(register_screen, text="").pack() # Set username label username_lable = Label(register_screen, text="Username * ") username_lable.pack() # Set username entry # The Entry widget is a standard Tkinter widget used to enter or display a single line of text. username_entry = Entry(register_screen, textvariable=username) username_entry.pack() # Set password label password_lable = Label(register_screen, text="Password * ") password_lable.pack() # Set password entry password_entry = Entry(register_screen, textvariable=password, show='*') password_entry.pack() Label(register_screen, text="").pack() # Set register button Button(register_screen, text="Register", width=10, height=1, bg="blue").pack() |
And now we have to add two things inside the main_account_screen() method.
|
1 2 3 4 5 6 7 |
global main_screen # add command=register in button widget Button(text="Register", height="2", width="30", command=register).pack() |
So now we can see the registration window
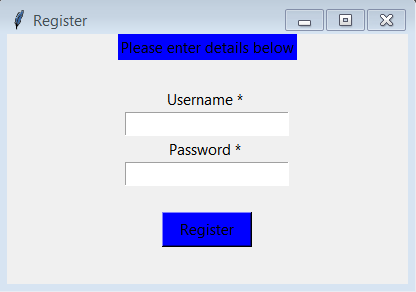
So, as user clicks register button on main window(first) then a new screen will be appear where user have to enter their entry.
Assigning Functions To Register Button
Now we have to implement event on register button. It means, after filling the entries, as soon as the register button is pressed, entries are saved in a file. So let’s see how to do it.
|
1 2 3 4 5 6 7 8 9 10 11 12 13 14 15 16 17 18 19 20 21 22 |
def register_user(): # get username and password username_info = username.get() password_info = password.get() # Open file in write mode file = open(username_info, "w") # write username and password information into file file.write(username_info + "\n") file.write(password_info) file.close() username_entry.delete(0, END) password_entry.delete(0, END) # set a label for showing success information on screen Label(register_screen, text="Registration Success", fg="green", font=("calibri", 11)).pack() |
And now we have to declare username, password, username_entry, password_entry as global so add following codes inside register() function
|
1 2 3 4 5 6 7 8 |
# set global variables global username global password global username_entry global password_entry |
And add one more thing inside register() function
|
1 2 3 4 5 |
# add command = register Button(register_screen, text="Register", width=10, height=1, bg="blue", command = register_user).pack() |
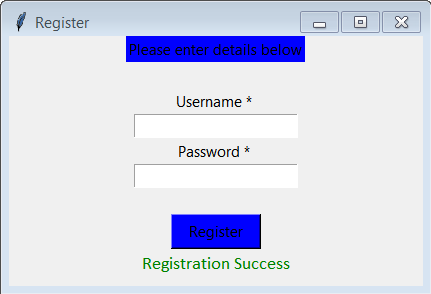
And now we will finally test our registration process. So fill the username and password field in register form and press register button. You will find, a Registration Success message on screen. So let’s see the output.
And after registration a text file has been created which contain user’s informations such as username and password. So the file like –
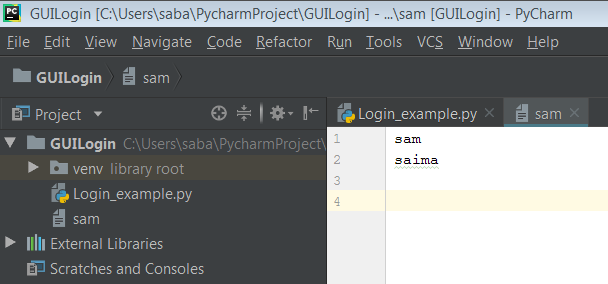
So you can see username and password have been saved successfully in this file.
Finally we have completed register process and now its time to move towards login process. So let’s start.
Designing New Screen For Login
We have seen register process, now we have to implement login process. So for this, first of all we have to design a login window. It is same as register window but having little changes. So the code for login is –
|
1 2 3 4 5 6 7 8 9 10 11 12 13 14 15 16 17 18 19 20 21 22 23 24 25 26 27 |
# define login function def login(): login_screen = Toplevel(main_screen) login_screen.title("Login") login_screen.geometry("300x250") Label(login_screen, text="Please enter details below to login").pack() Label(login_screen, text="").pack() global username_verify global password_verify username_verify = StringVar() password_verify = StringVar() Label(login_screen, text="Username * ").pack() username_login_entry = Entry(login_screen, textvariable=username_verify) username_login_entry.pack() Label(login_screen, text="").pack() Label(login_screen, text="Password * ").pack() password__login_entry = Entry(login_screen, textvariable=password_verify, show= '*') password__login_entry.pack() Label(login_screen, text="").pack() Button(login_screen, text="Login", width=10, height=1, command=login_verification).pack() |
The above code is same as we have done in register so here i am not explaining it.
And now add a line inside main_account_screen()
|
1 2 3 4 5 |
# add command = login Button(text="Login", height="2", width="30", command = login).pack() |
And now define login verification function.
|
1 2 3 4 |
def login_verification(): print("working...") |
And now our login screen look like –
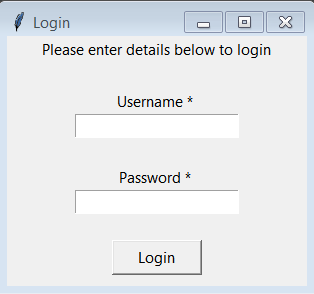
Login Verification Process
In this section we will verify the username and password for login. So let’s start
Defining Verification function
|
1 2 3 4 5 6 7 8 9 10 11 12 13 14 15 16 17 18 19 20 21 22 23 24 25 26 27 28 29 30 |
def login_verify(): #get username and password username1 = username_verify.get() password1 = password_verify.get() # this will delete the entry after login button is pressed username_login_entry.delete(0, END) password_login_entry.delete(0, END) #The method listdir() returns a list containing the names of the entries in the directory given by path. list_of_files = os.listdir() #defining verification's conditions if username1 in list_of_files: file1 = open(username1, "r") # open the file in read mode #read the file, #as splitlines() actually splits on the newline character, #the newline character is not left hanging at the end of each line. if password1 in verify: verify = file1.read().splitlines() login_sucess() else: password_not_recognised() else: user_not_found() |
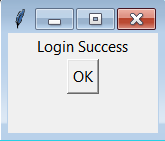
Designing Login Success Popup
Now we will define a function that will show a popup for successful login. If user has entered the valid entries then this popup will appear. So let’s see how to do it.
|
1 2 3 4 5 6 7 8 9 10 11 12 |
def login_sucess(): global login_success_screen # make login_success_screen global login_success_screen = Toplevel(login_screen) login_success_screen.title("Success") login_success_screen.geometry("150x100") Label(login_success_screen, text="Login Success").pack() # create OK button Button(login_success_screen, text="OK", command=delete_login_success).pack() |
And now define a function for deleting the popup. So write the code.
|
1 2 3 4 |
def delete_login_success(): login_success_screen.destroy() |
So now let’s see the output. If the user enter the valid username and password then the popup will appear as below.
Designing Invalid Password Popup
If user enter wrong password then a popup for invalid password will appear. So to do this we will define the following method.
|
1 2 3 4 5 6 7 8 9 |
def password_not_recognised(): global password_not_recog_screen password_not_recog_screen = Toplevel(login_screen) password_not_recog_screen.title("Success") password_not_recog_screen.geometry("150x100") Label(password_not_recog_screen, text="Invalid Password ").pack() Button(password_not_recog_screen, text="OK", command=delete_password_not_recognised).pack() |
And now define a function for deleting this popup. So write the code.
|
1 2 3 4 |
def delete_password_not_recognised(): password_not_recog_screen.destroy() |
So see the result,
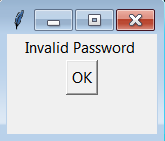
You can destroy this by pressing OK button.
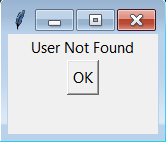
Designing User Not Found Popup
If user enter wrong username then a popup for User Not Found will appear. So to do this we will define the following method.
|
1 2 3 4 5 6 7 8 9 |
def user_not_found(): global user_not_found_screen user_not_found_screen = Toplevel(login_screen) user_not_found_screen.title("Success") user_not_found_screen.geometry("150x100") Label(user_not_found_screen, text="User Not Found").pack() Button(user_not_found_screen, text="OK", command=delete_user_not_found_screen).pack() |
And now define a function for deleting this popup. So write the code.
|
1 2 3 4 |
def delete_user_not_found_screen(): user_not_found_screen.destroy() |
So now we will see the output of above code.
Complete Code For Python GUI Login
|
1 2 3 4 5 6 7 8 9 10 11 12 13 14 15 16 17 18 19 20 21 22 23 24 25 26 27 28 29 30 31 32 33 34 35 36 37 38 39 40 41 42 43 44 45 46 47 48 49 50 51 52 53 54 55 56 57 58 59 60 61 62 63 64 65 66 67 68 69 70 71 72 73 74 75 76 77 78 79 80 81 82 83 84 85 86 87 88 89 90 91 92 93 94 95 96 97 98 99 100 101 102 103 104 105 106 107 108 109 110 111 112 113 114 115 116 117 118 119 120 121 122 123 124 125 126 127 128 129 130 131 132 133 134 135 136 137 138 139 140 141 142 143 144 145 146 147 148 149 150 151 152 153 154 155 156 157 158 159 160 161 162 163 164 |
#import modules from tkinter import * import os # Designing window for registration def register(): global register_screen register_screen = Toplevel(main_screen) register_screen.title("Register") register_screen.geometry("300x250") global username global password global username_entry global password_entry username = StringVar() password = StringVar() Label(register_screen, text="Please enter details below", bg="blue").pack() Label(register_screen, text="").pack() username_lable = Label(register_screen, text="Username * ") username_lable.pack() username_entry = Entry(register_screen, textvariable=username) username_entry.pack() password_lable = Label(register_screen, text="Password * ") password_lable.pack() password_entry = Entry(register_screen, textvariable=password, show='*') password_entry.pack() Label(register_screen, text="").pack() Button(register_screen, text="Register", width=10, height=1, bg="blue", command = register_user).pack() # Designing window for login def login(): global login_screen login_screen = Toplevel(main_screen) login_screen.title("Login") login_screen.geometry("300x250") Label(login_screen, text="Please enter details below to login").pack() Label(login_screen, text="").pack() global username_verify global password_verify username_verify = StringVar() password_verify = StringVar() global username_login_entry global password_login_entry Label(login_screen, text="Username * ").pack() username_login_entry = Entry(login_screen, textvariable=username_verify) username_login_entry.pack() Label(login_screen, text="").pack() Label(login_screen, text="Password * ").pack() password_login_entry = Entry(login_screen, textvariable=password_verify, show= '*') password_login_entry.pack() Label(login_screen, text="").pack() Button(login_screen, text="Login", width=10, height=1, command = login_verify).pack() # Implementing event on register button def register_user(): username_info = username.get() password_info = password.get() file = open(username_info, "w") file.write(username_info + "\n") file.write(password_info) file.close() username_entry.delete(0, END) password_entry.delete(0, END) Label(register_screen, text="Registration Success", fg="green", font=("calibri", 11)).pack() # Implementing event on login button def login_verify(): username1 = username_verify.get() password1 = password_verify.get() username_login_entry.delete(0, END) password_login_entry.delete(0, END) list_of_files = os.listdir() if username1 in list_of_files: file1 = open(username1, "r") verify = file1.read().splitlines() if password1 in verify: login_sucess() else: password_not_recognised() else: user_not_found() # Designing popup for login success def login_sucess(): global login_success_screen login_success_screen = Toplevel(login_screen) login_success_screen.title("Success") login_success_screen.geometry("150x100") Label(login_success_screen, text="Login Success").pack() Button(login_success_screen, text="OK", command=delete_login_success).pack() # Designing popup for login invalid password def password_not_recognised(): global password_not_recog_screen password_not_recog_screen = Toplevel(login_screen) password_not_recog_screen.title("Success") password_not_recog_screen.geometry("150x100") Label(password_not_recog_screen, text="Invalid Password ").pack() Button(password_not_recog_screen, text="OK", command=delete_password_not_recognised).pack() # Designing popup for user not found def user_not_found(): global user_not_found_screen user_not_found_screen = Toplevel(login_screen) user_not_found_screen.title("Success") user_not_found_screen.geometry("150x100") Label(user_not_found_screen, text="User Not Found").pack() Button(user_not_found_screen, text="OK", command=delete_user_not_found_screen).pack() # Deleting popups def delete_login_success(): login_success_screen.destroy() def delete_password_not_recognised(): password_not_recog_screen.destroy() def delete_user_not_found_screen(): user_not_found_screen.destroy() # Designing Main(first) window def main_account_screen(): global main_screen main_screen = Tk() main_screen.geometry("300x250") main_screen.title("Account Login") Label(text="Select Your Choice", bg="blue", width="300", height="2", font=("Calibri", 13)).pack() Label(text="").pack() Button(text="Login", height="2", width="30", command = login).pack() Label(text="").pack() Button(text="Register", height="2", width="30", command=register).pack() main_screen.mainloop() main_account_screen() |
You can customize the look of windows as per your choice.
Recommended Articles :
- XML Parsing In Python Using Element Tree Module
- Python Number Guessing Game – Implement Number Guessing Game With Python
- Python Calculator – Create A Simple GUI Calculator Using Tkinter
- Wikipedia API Python – Scrapping Wikipedia With Python
- Python Simple HTTP Server : A Simple HTTP Web Server With Python
So this was Python GUI Login tutorial. I hope you have understand this very well. If you found it helpful then please share with others. And if you are getting any difficulty while doing this then comment your queries. Thanks
Thank you for your help
Welcome Teshome Toleo
Are the passwords and usernames stored server sided? So if other people download this on other computers they will still need a unique username and password?
May I know how to I integrate this into another GUI. I want to make it so when I successfully login I can go into this other GUI and for both to work perfectly fine like it’s a standalone.
Thank you very much for your help
Welcome Saini
Thanks
you might wanna indent the first few blocks of the code and fix minor typos in the following small blocks.
Attribute Error:’nonetype’object has no attribute ‘delete’
username_entry.delete(0,END)
Thanks, this is a very easy to understand tutorial. Some typos in the code provided that you may want to check but nothing difficult to fix our side.
Thanks a lot, but the registration info not saved in a table inside a Database, can we make this ? i really appreciated your effort