Hello friends, welcome to the very first post of this website. Here we are going to learn Python Django Framework. It is Python Django tutorial for beginners. If you are an absolute beginner in python Django framework, then you came into right place. I will be using windows operating system. But you can still follow this tutorial using Mac or Linux. So let’s start.
Contents
Python Django Tutorial for Beginners – Overview
Prerequisites
To move ahead in this python Django tutorial for beginners you should have the fundamental knowledge of python programming. As we are directly moving on to web development using Python Django framework, I am assuming that you know the basics of python.
IDE Needed
Though using an IDE is not necessary you can also go the text editor way. But I will be using PyCharm IDE by JetBrains. You can download this IDE from the link given below.
What is Python Django?
As the punchline says, Python Django is The web framework for perfectionists with deadlines. So it is a web framework. We can develop Web Applications quickly using this framework.
Python Django Tutorial for Beginners – Configuration
Downloading and Installing Python
- Go to this link and download the python installer according to your operating system.
- Once you got the executable (I am assuming you are on windows) open it.
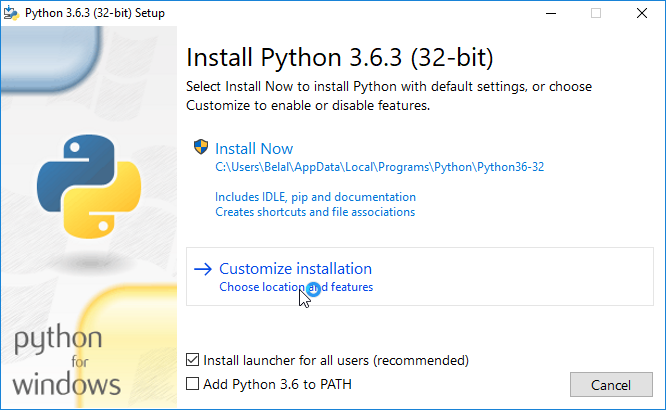
- Don’t install in the default location by choosing to install now (because the path is too long 😛 ), instead select customize location.
- Now continue the installation and while installing select the location shown in the below image. (You can change the location but keep it short, and the folder name and path should not contain spaces).
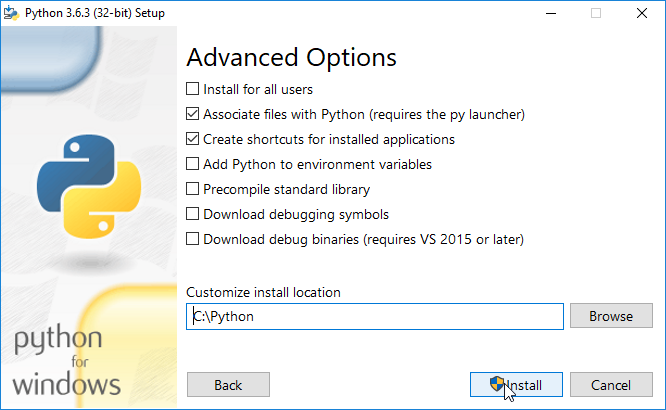
- After finishing the installation, you need to setup some environment variables.
Setting Up Environment Variables
To complete the installation, you need to setup python environment variables. Follow these steps to set environment variables.
- Go to your python installation directory (c:\Python) and copy the address.
- Now go to environment variables (search environment variables)

- Click on Edit the System Environment Variables.
- Now you will see a new Window called System Properties. In this window, you will find a button at the bottom called Environment Variables. Click on this Button.
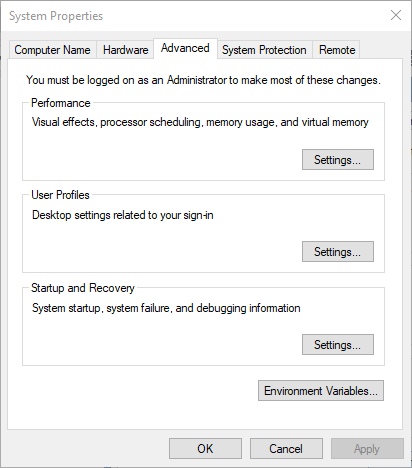
- Now in the system environment variable area click on new and in the name field type “path” without quotes, and in the value field paste your path. (see the below image for clarification).

- As you can see I have pasted one more address which is inside the python installation directory. You need to write this address as well (separate both addresses with a comma, the same as I did in the above image). Now click ok and apply the changes.
- Let’s test the installation is successful or not. So open Powershell in administrator mode. And type the following command.
|
1 2 3 4 |
python --version easy_install --version |
- With the above command if you are getting the following result then you are done with python installation.
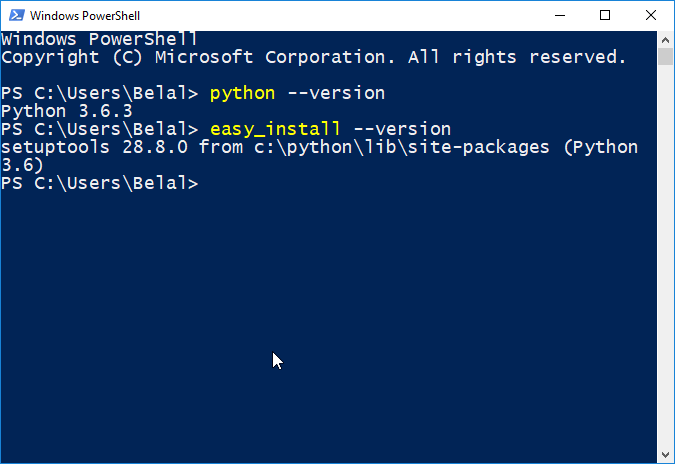
- As you can see the commands are working on PowerShell, it means python installation is successful.
Installing Django
We have done with installing python. Now let’s install Django.
- Type the following command inside Django and hit enter.
|
1 2 3 |
easy_install django |
- The above command will install the latest version of Django. It may take some time depending on your internet speed. After completing the installation, run the following command to confirm the installation.
|
1 2 3 |
django-admin --version |
- The above command will give the following result.

- If you are seeing the result as shown in the screenshot then BINGO! you have done with django installation.
Python Django Tutorial for Beginners – Your First Django Project
Creating a Project
Now we will create our very first Django project. Follow these steps.
- In PowerShell navigate to the directory where you want to create your project. In my case, I am using my drive F:.
- Now to create a new project type the following command and hit enter.
|
1 2 3 |
django-admin startproject MyDjangoApp |
- In the above command MyDjangoApp is the name of our project, you can change it to anything you want (Just don’t use spaces)

- After running the command check the directory that you selected while creating the project.

- So, we have a new folder in the given directory (F: in my case).
Creating our Server
- Now come back to PowerShell, and navigate inside the project directory.

- Inside your project, there is a python file manager.py. This file comes up with a bunch of features that we will use. For the detailed description of this file visit the official documentation.
- Now run the following command to start your development server.
|
1 2 3 |
python manage.py runserver |
- You will see the following result.
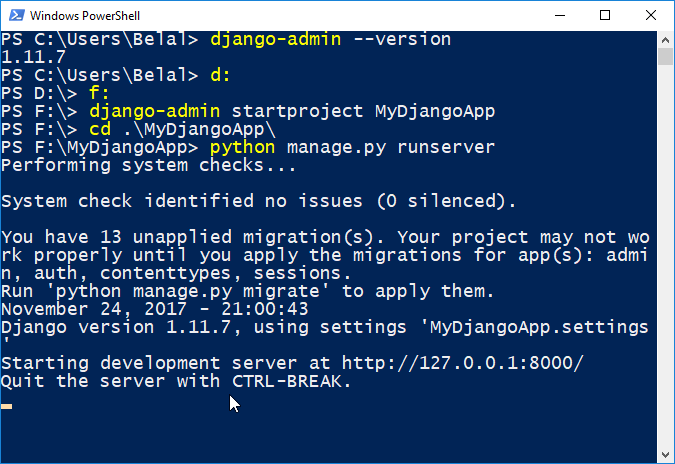
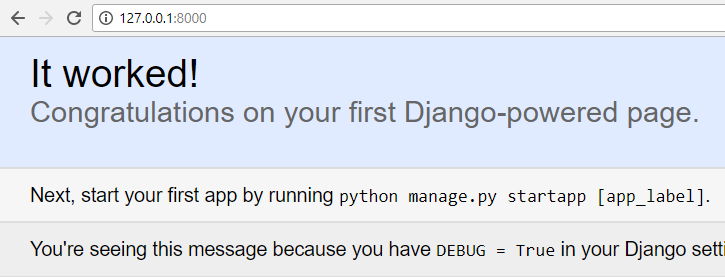
- As you can see the development server is running at http://127.0.0.1:8000/, type it in your browser to test. You will see the following result.
Next Post: Django Views Tutorial – Creating Your First View
Bingo! Your development server is working correctly. Now I am wrapping up this Python Django Tutorial for Beginners here. In the next post, we will start doing some cool things in our Django Project. And yes feel free to leave a comment if you have any queries or confusions related to this Python Django Tutorial for Beginners. Thank You 🙂

Thank you sir/mam , thank you so much for your tutorial .. i had not understood before i saw this tutorial… i completly understood about Django…Once again thankyou so much…..
Very good sir, I’m learning lots of things, please continue post, I want to learn more
Hats off to you Mashallah!!! Jazakallah
Ooh! Thanks fr this for it has been a wonderful teaching to me and am so grateful to understand this in a simplified format……
Thank you so much for this tutorial.